Growing mushrooms is not like growing plants. Most people are surprised to learn that fungi are actually more closely related to humans than to plants. They breathe oxygen, they can bruise, and they react to their environment in ways that can confuse beginners.
Once you understand how mushrooms behave, most problems are easy to fix or avoid altogether. This guide covers the most common issues growers face, what causes them, and exactly what to do.
1. Be Patient Colonisation Takes Time
One of the hardest parts of growing mushrooms is the waiting. Once you have inoculated your grow bag or grain spawn, it is very tempting to check it every hour. We get it — it is exciting. But constantly moving or handling your kit is one of the easiest ways to cause problems.
Here is what to expect:
- First signs of white mycelium growth usually appear after 5 to 7 days
- Full colonisation typically takes 2 to 4 weeks
- If you used a spore syringe rather than a liquid culture, it will take longer — spores need to germinate before mycelium can grow
Do not panic if nothing seems to be happening in the first week or two. Put the bag somewhere warm, leave it alone, and check it visually every few days without touching or moving it.
If you have seen absolutely no growth after 4 weeks, something has likely gone wrong. Common causes are temperatures that are too low, a failed inoculation, or contamination. Get in touch with the SporeAura team and we will help you work out what happened.
2. Slow or Stalled Growth
If your mycelium is growing but very slowly, the most likely cause is temperature.
Mycelium is a living organism. Its growth speed is directly linked to how warm it is. The ideal temperature for colonisation is 24°C to 26°C. Below this range, growth slows down significantly. In a cold UK winter, room temperatures can easily drop below this — especially at night.
What to do:
- Move your grow bag or spawn to a warmer spot, such as an airing cupboard or a high shelf (warm air rises)
- Use a SporeAura heat pad or heat box to maintain a steady temperature without having to think about it
- Avoid placing your kit near windows, on the floor, or anywhere that gets cold at night
One thing to be careful about — do not go too warm either. Temperatures above 27°C start to encourage competing bacteria and moulds, which can lead to contamination. The sweet spot is 24°C to 26°C.
3. Condensation Inside the Bag Is It Normal?
Yes, in most cases it is completely normal.
As mycelium grows, it produces its own heat. This means the inside of your grow bag or grain jar is usually a few degrees warmer than the room around it. That temperature difference causes water vapour to condense on the inside of the bag — just like a cold glass of water on a warm day.
Light condensation = healthy, active mycelium. This is a good sign.
When to be concerned:
If you notice water pooling at the bottom of the bag, or if the substrate starts to look wet, slimy, or sludgy — this can be a sign of bacterial contamination. Healthy colonisation looks fluffy and white. If the substrate looks wet and dense rather than dry and fluffy, check for other signs of contamination such as bad smells or unusual colours.
4. Non-White Growth, What Do the Colours Mean?
Not all colour changes are a problem. Here is a simple guide:
Creamy yellow tint — This is normal. Mature mycelium sometimes releases natural byproducts called metabolites, which can give it a slightly yellow appearance. It is more common when temperatures are on the higher end. Try keeping things a degree or two cooler and it should settle down.
Blue or purple patches — Almost always bruising from handling. Not contamination. See the section below for how to tell the difference.
Green, black, pink, or red patches — These colours mean contamination. Green is usually Trichoderma mould, which is one of the most common contaminants in mushroom cultivation. Black can be various moulds or bacteria. Pink or red is a less common but serious bacterial contamination.
Bad or unusual smells — A sour, rotten, or “off” smell is a very reliable sign of contamination, even if the bag looks normal visually. Trust your nose.
If you spot contamination, seal the bag tightly inside a bin bag before disposing of it. Do not open it indoors — mould spores will spread to your other kits.
Sadly, once contamination has taken hold inside a bag, it cannot be saved. Dispose of it and start fresh.
5. Blue Bruising, Not What You Think
This is one of the most common things that worries new growers, and in most cases it is nothing to worry about at all.
Mycelium bruises when it is physically disturbed — squeezed, pressed, dropped, or moved too roughly. The bruised area turns blue or purple. It looks alarming but it is harmless. The mycelium will recover on its own within a day or two. Just try to handle your bags more gently going forward.
How to tell bruising from mould:
Take a clean cotton swab (a Q-tip) and gently dab it on the blue area.
- Swab stays clean = bruising. Nothing to worry about.
- Colour transfers onto the swab = mould spores. Dispose of the bag.
This simple test takes 10 seconds and removes all the guesswork.
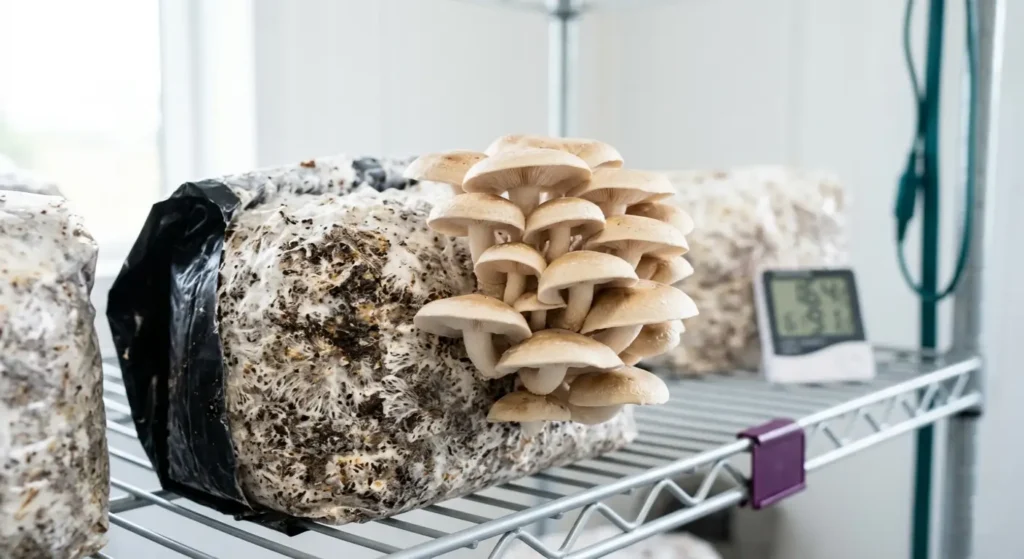
6. Mushroom Fruiting, What to Expect
Once your grow bag is fully colonised, it is time for the exciting part — fruiting.
How your mushrooms grow will depend largely on their genetics. Some strains grow in neat, uniform batches called flushes, where lots of mushrooms appear at the same time. Others grow more sporadically, with individual mushrooms appearing at different times.
- If they grow in uniform flushes — harvest all the mushrooms at once when they are ready, then prepare the bag for the next flush
- If they grow sporadically — harvest each mushroom individually as it reaches the right size
When to harvest:
Pick your mushrooms just before the veil tears. The veil is the thin membrane that connects the edge of the cap to the stem. When it starts to stretch and pull away, the mushroom is at its best. Once the veil tears, the mushroom drops spores and quality drops quickly.
To harvest, grip the mushroom at the base, twist gently, and pull. Remove the whole base — do not just cut the stem with scissors, as leftover stumps can rot and affect the next flush.
After harvesting:
The substrate will look drier after your first flush. Using a clean spray bottle, mist the exposed surface generously to rehydrate it. Leave it to rest for 5 to 7 days. Most bags will give you 2 to 3 flushes in total.
7. Contamination After Spawning
If you are mixing colonised grain spawn with substrate in a monotub and finding that contamination keeps appearing shortly after — you are not alone. This is one of the most frustrating problems for growers.
The contamination almost always enters during the spawning process itself, when the bag is opened and the grain and substrate are mixed together. At this point your kit is exposed to the open air.
How to avoid it:
- Spawn in a clean, draught-free area — a kitchen surface wiped down with isopropyl alcohol is ideal
- Wear disposable gloves and wipe your hands with isopropyl alcohol before touching anything
- Work quickly and put the lid on as soon as you are done
- After spawning, store your tub on a shelf at least 1 metre off the floor — most airborne bacteria and mould spores float at floor level, so keeping your kit up high significantly reduces contamination risk
- Avoid spawning near open windows, fans, or air conditioning units
Small changes to your environment and technique during this step make a very big difference to your success rate.
8. Mushrooms Growing Small or Very Sparse
This is something that surprises almost every new grower when they first hear it — small or sparse mushrooms are usually a genetics problem, not a technique problem.
Just like people, individual fungi vary massively. Two people of the same species can look completely different from each other. The same is true for mushrooms. The genetics of your mycelium determine the size, thickness, and yield of your mushrooms just as much as your growing conditions do.
The problem with spore syringes:
When you inoculate with a spore syringe, the spores germinate and fuse randomly. The resulting mycelium has a completely random genetic makeup. You have no control over what you get. Sometimes the genetics are great — large, fast-growing mushrooms. Sometimes they are not. It is genuinely luck of the draw.
The solution — liquid cultures:
A liquid culture contains living mycelium that has already been cultivated and selected for quality. The genetics are known and consistent. Every time you use that liquid culture, you get the same reliable results — faster colonisation, larger fruits, and better yields.
If your mushrooms are consistently small or sparse, switching from a spore syringe to a SporeAura liquid culture is the single biggest upgrade you can make to your grows.
Frequently Asked Questions
With a liquid culture, expect 2 to 3 weeks. With a spore syringe, allow 3 to 4 weeks as spores need time to germinate first. If you see no growth at all after 4 weeks, something has likely gone wrong and it is worth reaching out for help.
Yes. Light condensation is a healthy sign that mycelium is actively growing and producing heat. It only becomes a concern if water is pooling at the bottom or the substrate looks wet and sludgy, which can indicate contamination.
Contamination typically appears as green, black, pink, or red patches inside the bag. It is often accompanied by a sour or rotten smell. Healthy mycelium is white or off-white. If you see any unusual colours, do the cotton swab test to confirm and dispose of the bag if needed.
Probably not. Blue colouration is usually bruising caused by handling. Do the cotton swab test: press a clean swab gently onto the blue area. If the swab stays clean, it is bruising and the mycelium will recover. If colour transfers to the swab, it may be mould and the bag should be disposed of.
Small mushrooms are almost always a genetics issue. If you are using a spore syringe, the genetics of your mycelium are random and there is no guarantee of large fruits. Switching to a liquid culture with pre-selected genetics is the most reliable fix.
Contamination during or after spawning almost always enters during the mixing process when the bag is open. Work in a clean, draught-free area, use isopropyl alcohol on your hands and surfaces, and always store your tub on a high shelf — not on the floor — after spawning.
After harvesting your first flush, remove any leftover stumps, mist the substrate generously, and leave it to rest in fruiting conditions for 5 to 7 days. Most bags will produce 2 to 3 flushes before the substrate is spent.